Monday, 29 October 2012

Autumn Tova dress, and some thoughts on sewing through the seasons of life

This got done a while ago and I finally get round to posting the photos... just about within the right season. Ooh the excitement - it's another Tova!

When I made my first Tova dress this spring, I knew immediately I would want another by the time the cooler weather came around. It’s ideal for the turn of seasons: a fairly open neckline and three-quarter length sleeves, but with coverage enough to keep warm.


I’ve tried this year to stick to solid colours in my clothes. Much as I love prints, in reality I just don't wear them very easily. I’ve had this brown fabric for ages - it's shot through with orange and has a slight stretch, a nice drape and enough weight for winter. Perfect autumn outfit material, and finally gets it out of the stash (I had been itching to make something from it, but couldn't decide what).

As the original pattern is pretty short I’ve mostly been wearing my other tova as a tunic over skinnies or leggings. I wanted this one to be a ‘proper’ dress so I lengthened it (by about 10cm). The result, somewhat predictably given the design, was on the sack-like side. G took one look and opined that it needed a belt. Highly unusual both that he had an opinion and that I listened, but he was right. After one or two wears I also added some crochet belt loops to stop it shifting around.

Yes it's very wrinkled. Sometimes I sit.

To begin with I wasn’t entirely sure about how it turned out, but now I really like that it’s a different look from the previous one. It’s lost the A line shape but sits like a shirt dress, which is no bad thing.


Plus, as ever, it’s comfy. Coming to a realisation that I do not like to make things that aren't comfy :-)

:: :: ::

So anyway, I've been thinking on and off about what it is that's enabled me this year to finally get into a groove of sewing my own clothes successfully. The idea was, as more or less promised, to see if I can pin down some tips to share: being largely self-taught in this respect, it's been a slog to get here, and if I can help anyone else avoid that, so much the better!

But, the more I write and post here, the more I realise that actually, wardrobe sewing for myself is not what gets done most. As a proportion of my sewing time I really had no idea that it was so outweighed by sewing clothes for the children, gifts for others, and random accessories (and yes, I have a blogging backlog already).

When I started sewing seriously again, a couple of years ago, it was entirely motivated by sheer frustration with the shops and a determination to make clothes for myself that worked. Yet now, although I do shop far less, my personal fashion quest takes up much less of my sewing time than I imagine. I think the balance is about 30% clothes for me, 70% the rest.


Probably not to scale


I guess the obvious reason for this is that I happen to have two small children. It's got me wondering: is this just the natural state of affairs at this stage of life? That those with young kids are:

  1. unlikely to seriously resist the urge to sew cute things for them, and
  2. time poor and thus drawn to quick easy projects?

It's certainly the case for me, and I procrastinate making for myself because the process of fitting accurately and actually sewing larger garments is more time-consuming. Plus, the clothes I do make all fit into the easy-wearing category, when I'd love to let myself make some frivolous complicated things too.


Colette Ceylon: beautiful, but sadly too
frivolous and complicated for my real life


Or is it just time to admit to myself that I don't have the attention span for fashion sewing all the time? Will my kids grow up and leave home and I'll still be making sandwich wraps instead of difficult, stylish dresses? I see so many talented sewing bloggers making amazing clothes for kids, and I have to wonder what they'll be making when their children grow up (quilts??).

I'd be really interested to hear from you about this! Do you think our sewing inclinations and habits simply and necessarily evolve alongside our circumstances? Or could you say that you have a definite interest in one sort of sewing to the exclusion of others, regardless of circumstances? What's your sewing journey been - can you identify different seasons in your sewing life?

And, will I ever be free to make myself the fabulous wardrobe in my head??

(I would really like 'yes' answers to that last one ;-)

Follow

Friday, 26 October 2012

Toil and trouble

Actually, the only trouble with this was my vow to never EVER sew costumes for the children. Yes, yes, I am a heartless witch. It was just a step too far from proper sewing, thank you.

But I hadn't reckoned with L.


She took that vow and cunningly threw it into the cauldron along with:
  • a ladleful of school dress-up day
  • a generous dose of plaintive comments about what her friends would be wearing
  • a small but potent pinch of maternal competitiveness
Abracadabra!


A mini warlock costume will inevitably have to follow. I fear I've set a terrible precedent...


Do you do Halloween, and if so, are you making costumes? It's not exactly a tradition native to Belgium - far from it, in fact. But where the shops lead, popular culture follows...  condemning those of us too late to Aldi for the 6 euro outfits to slave over the sewing machine and make our own :-)

Linking this up to Sew Mama Sew's linky party - look at all those ideas!

Follow

Tuesday, 23 October 2012

Scout woven tee


Against all expectations, this one's been getting a lot of wear.

Not that I don't like the pattern. On the contrary, I love it. It's grainline's Scout woven tee, which I bought at the beginning of the summer with much enthusiasm for it as a warm-weather wardrobe staple. It makes a really, really good t-shirt: flattering, easy to wear and treading the line between relaxed and stylish perfectly. The shape of it is great. Unfortunately, I didn't get round to discovering this in practice until the middle of August, by when the season was already on the turn.

Unfortunately too, my attempt at a wearable muslim was unwearable (because why did I steam ahead with a narrow back adjustment when the back is supposed to hang anyway?? With the shoulder seams slightly forward, it made the whole thing sit funny, which I should have guessed) and I nearly threw in the towel at that point. But it's a quick and satisfying sew, and as I was heading back to put it in the recycling pile, my attention was grabbed unceremoniously by this African print.

Against my better judgement - because I almost never wear prints on  my top half, and my previous opinion of this fabric had been tablecloth material at best - I sewed another one immediately. A couple of times recently I've gone with a completely unexepcted hunch, and it worked, so I'm beginning to just believe in the sewing fairies and follow.  Lo and behold, I wasn't sure what I thought of my finished t-shirt to begin with but, with one wearing, realised I like it very much. It grows on me every time I put it on.

There will be more of these t-shirts to come. Next spring, when I really will be much better organised with my seasonal wardrobe sewing. Really.

:: :: ::

The notes:
  • Scout woven tee by grainline studio.
  • Adjustments: no-dart full bust adjustment and correction for gaping armhole.
  • Changes: I made the back about an inch longer than the front, with a small split/vent at the the bottom of the side seams.
  • Overall verdict: great pattern! Very easy to sew with lovely detailing.
  • Fabric from my late mother in law's stash, brought back from a trip to the Congo (knowing this provenance makes wearing it all the better).

Follow

Saturday, 20 October 2012

Pimp my neck

I'm blaming the Purl bee. This picture is what started it:


Who wouldn't want a stylish long pom pom cowl? I pinned the tutorial last year and am not exaggerating when I say it has been following me around ever since. For several months I was actually impatient for autumn to arrive so I could get pom pom shopping.

Strictly, though, it can't really be said that the outcome was anyone's fault but my own.


Alas, it didn't stop there:


Yes, with a total lack of the kind of restraint that leads to tasteful cowls as illustrated above, I purchased four whole metres of giant pink pom poms. Why four metres?? (And why giant and pink, one might well ask). I have no idea. It turned out to be precisely enough for a not-very-tasteful but happy and loud cowl, and a leopard print triangular scarf.

The leopard print is a very warm, soft, comfy knit that I found in the remnant bin at Berger for almost no euros (all my best fabric finds have come from that bin).  The striped fabric is a scarf from Forever21 that I bought ages ago because I liked the pattern (and I was supposed to stop doing that randomly. Doh!). I chopped the fringes off and used a big strip from an old orange sheet to make it into a large pom pom-ed tube.


There are instructions here on how to make a tubular cowl like this: basically, you don't want to sew it into a circle before turning it right sides out, because if you do you will just keep pulling your loop through itself forever. Ask me how I know this. (And no, it's not because I'd read that first, even though I had).

I've never really been a scarf person, but all of sudden, I am. There'll definitely be more - and I suspect this is not the last time pom poms will be involved, either.

Perfect park-with-kids wear, oh yeah
Follow

Wednesday, 17 October 2012

Velcro-closure kids' apron + tutorial!

Post-KCWC but I'm still on the kid stuff for one more post!

Aprons have been multiplying around here. Having made one for school (sadly unblogged) and one for T, I now had to make one for L for at home.


Of course it has pockets (and this particular design is also a good way of remedying things when you accidentally cut your apron front too small).


And I finally have approached velcro-closure apron perfection!


Now, I attempted to photograph the velcro-tab closure process so as to write up a nice clear tutorial. But of course this is an art in itself, and one at which I am not yet good :-).

However, the sewing itself is not difficult, so here's my brief explanation, with illustrations rather than pictures of what I actually did, which was inexplicably messy.


(Don't like metric measurements? Have a converter!).

This is a hack of this excellent art smock tutorial. I'm just going to show you how to adapt the back pieces to shut with velcro instead of ties, as in my view this is easier for little kids and busy teachers. For the rest of the construction you'll need to refer to the far superior original!

First, cut a piece of velcro about 10-12 cm long. Much shorter than this and it won't hold the apron shut securely.


Now make your pattern piece as instructed, but don't curve the back bottom corners. We're going to make two different back pieces.


1) The right hand side.

Take your basic pattern piece:


and make it wider along the centre back by the width of your velcro:


Cut out your fabric and zigzag/overlock along the new back edge.


Iron/press the added width back towards the wrong side.


Sew the SOFT side of your velcro in place at the top on the RIGHT side of the apron back piece (about 1.5 cm from the top edge):


One side done!


2) The left hand side

Take your basic pattern piece and draw the tab for your velcro on it at the centre back. The tab should be the same width or slightly wider than your velcro, and the length of the velcro plus about 3 cm.


Add seam allowance along the outside edge of the tab and centre back.


Cut one back piece of this shape, and one narrow back facing. Watch out here - you need to flip over your fabric (or the pattern piece) before cutting the facing out!


Zigzag/overlock the long straight side of the facing. Then, right sides together, sew the pieces together around the tab and down the back.


Clip corners and turn the facing to the wrong side, poking out the corners of the tab so it's nice and rectangular. Iron/press in place.

Sew the SCRATCHY side of the velcro to the WRONG side of the tab.


Um, this picture is the wrong way round.
The velcro should be in this position
on the inside/wrong side of the apron!

And voilà, two adapted back pieces! They're slightly more bulky than the original version - I chose to do it like this as it's not only a tidy finish but gives a bit more strength to the areas where the velcro will pull apart.

Now you can just follow the construction method in the original tutorial. When finishing the hem and neckline with bias tape, simply fold over the ends to enclose the raw egdes.

Hope someone out there finds it useful!

Follow

Sunday, 14 October 2012

Funky pinstripe trousers: KCWC wrap


The end of Kids' Clothes Week Challenge Fall 2012. One more item done, and two still remain in the cut-out-and-ready to go pile. I quite like them there just waiting for the right mood to take me.

My sewing machine lost its mojo around Day 5. I got into making a pair of trousers for T out of one of G's old suits. There was a lot of this happening:


And thus a lot of seam ripping. This was after the full dis-assembly of the machine on Thursday night to get dust out (so much dust! oops for the not-so-regular maintenance).  And then some stupid mistakes caused by pressing on when I should have stopped. Stupid mistakes like attaching pockets with triple stretch stitch topstitching, so as to pop out and look all cool, but doing it in the wrong place. You do not want to unpick that, believe me.

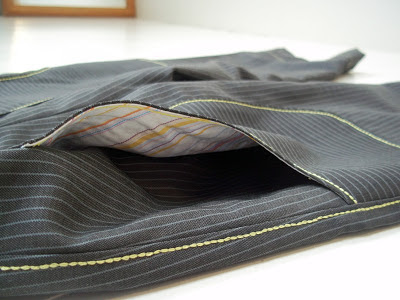
And in the end, once it was all fixed and done (and that took me the rest of my daily sewing hours), I'm not sure how much I like these trousers. I don't know if slippery recycled suit fabric and bright yellow topstitching really work. But what the hell, they're wearable. This kind of gives an impression of the effect I was trying to get (so it wasn't entirely unsuccessful, obviously):


The pockets are lined with fabric from an old shirt of G's. I picked it as it had the same yellow in as the topstitching.


The trousers themselves are fully lined with a very loud yellow cotton, but I didn't manage to get any pictures of it. It was the only suitable fabric I had to line them with - and this is where the whole yellow thing started.


Collage pictures of T are the way forward. He really never ever stands still enough for an actual portrait.


:: :: ::

Having complained beforehand that I don't feel creatively inspired to sew for my kids, I feel as if I've had a lightbulb moment this week. I really, really enjoyed pushing myself to get excited about it. I've realised - from looking in the flickr pool and reading people's KCWC posts - that it's just the same but different. 'Design' for your children is a thing, too. A fun thing.


Follow

Thursday, 11 October 2012

Schoolday shirt

Yeah yeah yeah, I am having KCWC fun!

All that cutting beforehand was totally worth it, because turning out the fast funky stuff this week is unbeatably cool. And the photoshoots... yessir we're enjoying them too! Even first thing on a cold morning doing the kindergarten commute!


Stand still? No he doesn't much.  Exclamations? Yes I do!

P.S. How obvious is it that I just discovered pixlr? Brilliant!

:: :: ::

Pattern: simple shirt from Sewing for Boys (and it really is very simple).
Fabric: from the Chien Vert. Previously used here (simple shirt, papa version)

:: :: ::

UPDATE: I can't believe this got featured on elsie marley's KCWC day five round-up! All credit must rightfully go to my little poser - well done on the modelling moves, little T!

Follow

Wednesday, 10 October 2012

The pretty horses circus pants

We LOVE these trousers!


My attention had already been well and truly grabbed by the first couple of posts in elsie marley’s pre-KCWC pants-hacking guest series, when spiegelstiksels came along and posted her circus pants. You know, for the circus school-attending trouser-hating little girl in your life.

So happens I have one of those too. And the KCWC inpsiration that had been waiting to strike, struck immediately. Copycat comfy trousers!

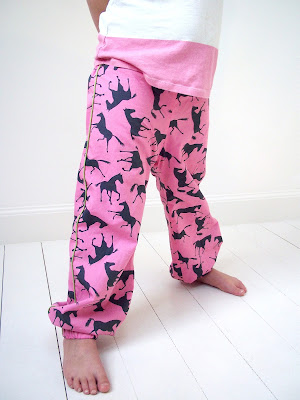
With a green go-faster stripe down the side:


They obviously have to be extremely comfortable so, just like the originals, they’re lined with knit fabric. But I also wanted them to not look too pyjama-y, so I cut them with a flat front. The elastic goes all the way around the waist but is stitched down at the side seams so that most of the stretch is at the back.


I think they came out absolutely perfect! I slashed and spread the pattern to make it bigger and am so happy with how they fit. The length with the elasticated ankles is great, and the lining makes them sit really nicely.

Ideal for practising circus moves and posing (how great to have a daughter who now likes posing instead of hiding and sulking!)


And now proudly but poutily modelling the official circus school t-shirt:


Mu-u-u-um sto-o-o-o-op!

OK, end of photo shoot.

She picked the fabric out from a pre-selected few from the stash. I was surprised she went for this one, because black is usually a total no-no. Apparently it won because of “all the pretty horses”.  And thus the entire time sewing it, I was haunted by the memory of struggling through the Border Trilogy. Anyone else tried? I did finish and was pleased I’d read it, but really, never again.

Follow

Sunday, 7 October 2012

Works in progress: KCWC!


I think a stack like that can only mean one thing, no? Kids' Clothes Week Challenge starts tomorrow! I feel like a bit of a cheat having cut out everything beforehand, but I really like the idea of actually sewing for an hour a day and thus hopefully getting some finished stuff out of it.

The plans for T are, on the top row:
  • Striped long-sleeved t-shirt, from an old Boden tunic a bit like this top (worn until it was stretched shapeless, but still very recyclable!)
  • Mini-me simple shirt: pattern from Sewing for Boys.
  • Trousers, upcycled from a worn-out suit of G's. Lined and with pockets (pockets bring disproportionate happiness when added to kids' clothes, don't they?)
And for L, on the bottom row:
  • A drapy, stripy, stretchy sweater.
  • Comfy trousers for circus school (can you tell that she had a hand in the fabric choice?)

For both pairs of trousers I'll be using the MADE basic kid pants pattern. I've used it before, last year:


These were the first trousers I ever made, and got me over my slightly inexplicable fear of the whole process. I've been loving elsie marley's pre-KCWC series on hacking this pattern (especially this and this) - it's been really inspirational to think how plain trousers, and trousers for boys, can be used so creatively (and I'm blatantly copying one of the ideas that's been posted).

I actually have real trouble thinking creatively about making kids' clothes. I'm just never struck with the inspiration. Maybe it's the fact that they grow so fast: I don't want to let them have the good fabric and put all this effort into something that will be too small too quickly, or just plain rejected, whether they were involved in the whole process or not. Add in that I have much less experience with kids' clothing of that trial and error that leads to getting things right, and the result, of course, is that I rarely end up making clothes for my children that I actually like (though sometimes I do). The fit isn't right, or the colours or fabric, or it just looks homemade - and not in a good way.

Much of the the problem, I think, is not knowing what I want. I don't have a style in mind for my kids, I just want them to be covered up and comfy. That removes all the scheming and dreaming of the sort I do about my own clothes. For them, I just look with ennui through the pile of fabric awaiting a destiny, until I decide something is good enough. Not exactly inspirational decision making.

Every time when KCWC comes round I feel a strange sense of irritation with myself for being so keen to sign up when I'm actually so unenthusiastic. But for me it's a good process, a chance to embrace kid clothing a little bit more. This time round maybe I'll just let go of the angst, and allow some real creativity to seep in as I wade through those piles up top there.

Your thoughts on sewing for kids? This post really got me reflecting too. Reactions?

Follow

Thursday, 4 October 2012

Apron for T

When they start big school, our kids have to take their own art apron. It stays there all year and in theory comes back for a wash somewhere in July (last year's didn't come back at all).

T isn't there yet, but he was so overcome with jealousy when he saw the one I did for L, that I had to promise him his own one to use at home. Luckily, this was a promise I was happy to both make and deliver on, because since L started school I have been on a seemingly never-ending and by now slightly obsessive quest to find the perfect kindergarten apron design.


The pattern I used previously was Sew Liberated's Montessori Child's apron. It's a good design, but when it came to making another one this year, I realised I wanted something with more coverage - smock rather than apron.

Enter this tutorial.

Of course, not being able to leave a perfectly good idea alone, I adapted it to close with velcro instead of ties. To my mind this is much less fiddly, which is probably good for a teacher trying to get aprons on 28 kids at once, and with a bit of luck and practice I don't think it'd be that hard for a 4 year old to get it done up by themselves.


Now, I considered not telling anyone about the trial and error this took. But I'm a firm believer in sewing blog transparency (yes, I know there are more important things) and I'm not going to just post pictures of what looks like a perfectly finished, customised art smock and leave it at that.

This is what I did first at the back:


I sewed it closed, with a rather nicely executed back split for the velcro closure (my first ever, taken from the instructions for a pencil skirt).


Of course, getting T in and out of this apron was a wriggly disaster. In retrospect, what the hell was I thinking?? This was completely forseeable! And really not something that'll make anyone's life easier in class.

So, there followed some of this:


And then I tried to tidy it up a bit, by zigzagging around the corner and topstitching down what had previously been the back seam allowance.


By this point I was not that bothered about actually sewing in a straight line. (Actually, I wasn't in the first place - it's only an apron).


Now just to finish off the ends of the bias tape at the bottom hem. Fortuitously, I had earlier been anally retentive meticulous enough to sew the ends of it together with the join matching up exactly at the centre back seam. How's that for attention to detail! Careful unpicking had left me with about ¼" extra tape to try and fold over the raw edge. Sadly, this was not enough for me to do so neatly.


It's only an apron it's only an apron. No really, I actually hardly care.

And voilà, much better:


Isn't he gorgeous? ;-)


Fabric info

  •  Front: Echino by Kokka, medium weight cotton. I had a fat quarter from Schleiper which was just enough.
  • Back: upholstery-weight stripes from Ikea.

I put pockets on the front to balance out the fact that the back was heavier. Full disclosure: I didn't have the foresight to do this in advance, I wrestled them on to the finished apron because it was hanging weirdly. I'm just not that good at thinking things through.

Follow