Showing posts with label recycling. Show all posts

Monday, 30 December 2013

Top Five of 2013: hits for the kids

Hello and belated Merry Christmas/Happy Holidays/etc! I hope you've all had a good one and are now safely recovered from overeating or whatever other seasonal excesses you may have indulged in (your extended family?)  We're in the middle of a 10-day stay at my parents', which is wonderful but busy - between us all there are 9 adults and 4 children, in a house designed for significantly fewer people. We all need our tactics to escape the mayhem every now and again, and I'm having my moment to do a little blog catch-up. Sewing as refuge, even when I'm not doing it :-)

Anyway, on with the Top Fives! I've been considering not doing a Top Five Kid Hits after all, but it makes up such a big and enjoyable part of my sewing life that it'd be remiss of me not to include them. However, I'll be moving on quickly tomorrow to the year's Top Five Fails, which as far as I'm concerned are among the most interesting of everyone's lists - it's fascinating to see what didn't work, when so much of our blogs' focus tends to be on things that did work, or the process of getting them to turn out well.  So, here we go! If you want to see the original posts, click on the photos...


1) Skater dresses


This one's my favourite of the Kitschycoo skater dresses I made my daughter this spring. They've both been worn almost to death (demonstrating in the process why the serger should be used for finishing seams, not necessarily attaching them) and she's now much taller than she was - time for some winter versions in the new year!


2) Popover sundress hacks


The free popover sundress pattern by Oliver & S is a hit on it's own, but this summer I had great fun messing around with it too. The big twirly maxi version above is fantastic on very hot days, and I've seen quite a few other versions crop up both online and in real life, which is extremely gratifying :-)  (If you'd like your own, the picture links to a tutorial).  The pompom trimmed dress below has a crossover back, and is still in heavy wardrobe rotation despite now being on the small side.


3) The Primus tee


I have to include this because it's just so cool. It's made using the sleeveless kid skater bodice, upcycled out of a promotional t-shirt from one of Belgium's biggest breweries. I've lost track of the number of times people have commented that they didn't know they made children's t-shirts too, and asked where I got it.  If only I had more of the original tees, I could go into production.  Plus, look at my little rock star :-)


4) Birthday crowns
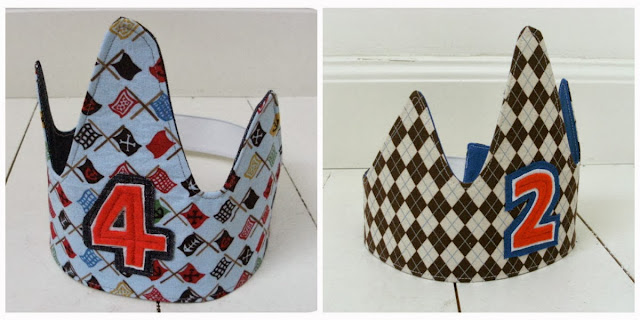

Pretty self-explanatory! This year I upped my game from the quick and dirty felt versions I used to do, and very pleasing it was too.


5) Sandwich wrappers


And finally, a hit for the kids that I suspect I appreciate much more than they do (though who am I kidding, that probably applies to all of them). It gives me a small but important sense of satisfaction to wrap their packed lunches up in these every schoolday - and those little impacts are, for me, just what home sewing should be about. Unfortunately, on the very last day of term T forgot his school bag on the bus, meaning that a replacement is due before next week - I might just make an upgrade for my old one while I'm at it. Kicking off 2014 in style!

And there you have it, 2013's hits for the kids. See you tomorrow with 2013's misses!


Follow

Friday, 27 September 2013

Local gifts for local people

Have you come across Laura of Behind the Hedgrow yet?  She's a new-ish and recently new-to-me blogger who makes lovely stuff, for herself and for her kids, and writes about it in a very readable and enjoyable way.  So before I ramble on, I thoroughly recommend a good read and a follow! However, let me be totally up front here: what excited me most when I discovered her, was her walls.

I was timewasting on Pinterest the other day when I saw a picture of her absolutely beautiful Liberty skater dress. And no sooner had this garment's gorgeousness sunk in than the realisation struck me: "hang on - semi-exposed brick? Peeling white paint? Bright but grey daylight? AND funky children's clothing? This blogger can only be in Belgium!"

And of course I was right :-)

All of which is a long-winded way of introducing some children's clothes, on my garden walls.  Because there are not just new-to-me Brussels bloggers round these parts, there are new Brussels babies aplenty as well.


And you can't make things for newborn boys without making things for their big sisters as well. The little t-shirt on the right is for a little T, and the bigger t-shirt on the left is for big sister S. T's shirt is from this free pattern - I just could not get the scaling to print out right, so I guessed a random size and it's probably far too big. S's t-shirt is a lengthened skater dress bodice, size 18m - 2yrs: she's just over two, but my T insisted on trying this on and it fit, and he's four, so I guess it'll be too big as well. Good thing kids grow I suppose. Both t-shirts are made of recycled adult tees and fabric scraps.


Baby A gets a stuffed inital. I enlarged hugely the A from the free Ottobre sulo applique letters, because I like the shape of them so much. The back fabric is towelling; the front is Alexander Henry quilting cotton. I bought a metre of it ages ago and have got so much use out of it, one gift or pair of trousers at a time.

And finally, I couldn't leave out A's big sister E, now could I? She gets her very own skater dress!


This came out an awful lot greener than I expected (though really, what did I expect?). But apparently she likes it and is quite taken with the little squirrel on the front, so, phew. I've seen her wearing it and it's also pretty big - I think she might still be getting some use out of those long sleeves next winter as well.

All in all, I have to say I really enjoyed making a whole lot of little gifts for little people. So much so that it's got me thinking quite a lot about what I actually like to sew, and how I use my time and abilities. In my head I'd make myself an entire bespoke wardrobe, and I certainly have no intention of giving up the many patterns and fabrics I have planned for myself. But I also have all sorts of ideas swirling around my head about how to get the right balance of time and importance between the kinds of sewing I do.  It's got something to do with that connection - the babies we know, the crafts in our communities, that putting together of our hands and our hearts.  Who knows, maybe my thoughts will come to something and I'll tell you about them :-)

A few days after we'd given baby A and sister E their presents, we bumped into them and their grown-ups at the playground. This happens quite often after school; we don't live far from each other. I'm very glad that my L and T are such good friends with both the littles and the bigs among my friends, that we have this kind of community - though in such a different way from how it was for me, growing up in a non-urban environment in the UK.

A and E's mum knows how to do french plaits, even on short-ish hair. L thinks she's the best.


Follow

Monday, 29 April 2013

Roots, beer, clothes for the boy

 
On the road into G's hometown is this. This is the Primus brewery.


Where they make, among other things, Primus beer: 


Among the other things they make is apparently promotional t-shirts. Remember this? :


G's dad still lives in G's hometown, and every now and again he'll go to some sort of social event / fundraiser and buy a tombola ticket. If he wins, which he seems to do with great frequency, he may well donate his prize to us. I must say here that the prizes are often less good than this one. But this XXL men's t-shirt - well I saw G about to politely refuse it, and had to intervene.

I mean, couldn't he see the potential?


It had toddler rock star potential!


Is he not adorably, absolutely, mini Jon Bon Jovi? I'm probably biased or something, but seriously - I could actually EAT him.
 
(Pattern is the sleeveless skater dress bodice, size 3-4, lengthened).

Follow

Monday, 22 April 2013

I am a soft-spined weakling


Who is utterly unable to resist the lure of Kids Clothes Week. I have a horrible horrible cold, I'm busy, there's plenty of other stuff I could be getting on with. 
 
But, you know, it's fun. It's a bit of a challenge and a lot of community, and I'm kind of a sucker for both of those things, especially if there's sewing involved.
 
Thus, we have here an explosion of activity and brightly printed fabric.


Because also, L needs dresses. Lots of dresses. She'd rather wear dresses than anything else, and as she's grown out of everything again, it seemed futile to fight it. Under these circumstances I think you'll agree that I was practically obliged to buy the patterns - the fact that I'd been eyeing them both anyway has nothing to do with it.


The roller skate dress I've mentioned already. There will be another. There will also be skater dresses. Oh yes, there will be many. I've already made up this pattern once (but failed to photograph the results) and it's another total corker. I'll write more about it when I've got a finished one to show you; for now I'll just say: thank you Amanda! You evil genius with your fabulous patterns and shop full of wondrous knits.
 
For girl-boy balance I'll be upcycling a top for T from this XL men's t-shirt, generously given to me by my father-in-law who won it on a tombola.


I doesn't look like much, but I have a Secret Plan that hopefully will turn out well (or I'll just totally regret ever having mentioned it and we'll never speak of it again, ok?) He also wants a Red Indians t-shirt from the fabric below, so I've been cutting a skater dress very carefully out of my precious metre of it and should be able to oblige.


And that's the sum total of my ambitions. It think it'll be plenty, given I can only breathe through my mouth right now (where am I going to put my pins??)

I hope to be back soon with some actual makes!

Who all else is sewing along with KCW? What're you planning, and how's progress? I'd love to see!

Follow

Wednesday, 23 January 2013

DIY snow warrior!

Or, as this post could be but definitely isn't subtitled: how you too can look like a jihadist in fleece.


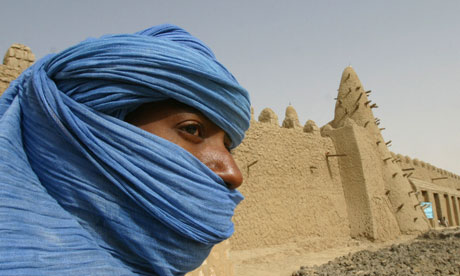
Truly and honestly, the slightly unfortunate nature of this pose did not occur to me until I was on the other side of the camera, downloading - I was just trying to show off all my cold weather defences at once. And then the first thing that sprung to mind was the rather beautiful traditional dress of the Tuareg - the "blue men" of the Sahara.

The hot-weather version - click for source

But then - war in Mali, hostages in Algeria. I don't know what to say (or actually even think) about these things, and I could just not mention it, I suppose. But although this is and will remain my little sewing bubble, it would seem a bit wrong not to acknowledge where that whole thought process went - ignoring such things does us all a disservice. However, for the moment I shall not be stepping, well-intentioned and ill-informed, into current affairs. I suspect I may be of more use to humanity in sharing my tips on how to sew yourself some maximum wind-chill protection. Would you like details?

Oh, I'm so glad you would! :-)


The mittens were what started it. Two Saturdays ago I went out with T and got very cold hands, and came home and looked up a tutorial for fleece-lined mittens and had them sewed up in less than an hour, and then went out again, this time with much less cold hands (to begin my search for a serger - but that's another story!) By the time I got home again, I had already designated the first mittens a trial version, and these little beauties are my second, victoriously successful pair:


And once I had the fleece out anyway, it was but a small step towards a matching hat and cowl.


Further adventures out of the house demonstrated that the cowl was too draughty to be sub-zero effective, and thus there followed something that I believe gets called a neck gaitor, but what I shall glamorously call a fleece neck tube, to go underneath (because a gaitor is for your legs, and sounds silly besides).

With the fleece neck tube worn up over your nose, this get-up is warm. Warm like, I took off one glove for 30 seconds on Sunday and my hand hurt with the cold for 10 minutes afterwards - while the other one was too hot. I start sweating on the short walks in the snow, without exerting myself in the slightest.

Having pulled together this lot over a week of 15-minute sewing here and there, I figured I would quickly round up the tutorials and techniques I used, because if you're organised and have a free couple of hours I don't think it would take much longer than that. Which could be helpful for those in colder climes (sorry, Antipodeans! Hope you're enjoying your summer!)


 Materials:
  • Lining and neck gaitor: fleece! For all of these items make sure to cut your pieces with the stretch going from side to side, not lengthways.
  • Outers: for the hat and mittens (blue fabric) I used an old sweater, not felted because it wasn't wool and wouldn't shrink :-)
  • The yellow mittens outer piece is a shrunk piece of boucle wool.
  • The blue side of the cowl is cotton jersey. Feels nice and cool, in contrast to the fleece, but adds an extra layer of warmth.
  • And finally, ribbing for the mitten cuffs.
Depending on the size of your stash, you may or may not already have this at your disposal. I did (the shame! I shocked myself with the contents of my 'leftovers' box!)

Mittens
  • I first used this tutorial and free pattern: a very quick sew because there's no cuff. I found this to be a disadvantage, so...
  • My über-successful mittens are based on the purl bee's free pattern. The shaping of these is lovely.
  • I cut a slightly increased seam allowance of 1 cm (3/8") around the outside, i.e. a 1/8" increase, and added a full 1.5cm (5/8") seam allowance at the wrist.
  • Sew the outer and lining according to the instructions in the first tutorial (purl bee's mittens aren't lined so the tutorial doesn't include instructions for that).
  • The cuff: sew a tube of ribbing twice the length you want your finished cuff, plus a bit for the seam where you'll attach it to the glove (I stretched the ribbing around my wrist to decide the width of it). 
  • Sew the ribbing to the outer piece, right sides together, and then stuff the glove part inside the tube of ribbing. Sew the other end of the cuff piece to the fleece lining, leaving a 2.5 cm (1") hole.
  • Turn the glove right side out by pulling the entire thing through the hole between cuff and lining.
  • Sew up the hole by hand.

Look how cosy! And no-one will ever see just how rubbish my hand stitching is!


Hat
  • I used this pattern, cutting the same shape for the outer and inner fleece hats.
  • But, I sewed the sides together instead of knotting them, using a slightly smaller seam allowance for the outer hat.
  • Just like for the mittens, wrap the ribbing around your head to decide how tight you want the band to be, then cut a piece double the finished length you want.
  • Sew the short ends of the ribbing right sides together to make a loop.
  • Sew this loop to the outer hat, right sides together, then to the fleece lining, also right sides together and leaving a 1" gap.
  • Pull the hat right side out through the gap, and hand-stitch it shut.

Cowl
  • Cut two identical lengths of fleece and jersey (or other desired outer fabric - but it'll work best with a bit of stretch in it). Mine were one fabric width (150 cm) by about 30 cm.
  • Sew it into a looped cowl like this (and don't again end up sewing it inside out. Yes really, again).

Fleece neck loop thing (otherwise known as a neck gaitor)
  • Cut a piece of fleece about 30 cm long. The width should be about the circumference of your head (over your ears) plus a bit. Fleece does stretch but mine's a bit tight and it's a little fiddly to get on. However, too loose and it'll be draughty and thus not fit for purpose.
  • Sew it into a loop along the 30 cm sides, right sides together.
  • Hem the raw edges if you like - I didn't!

Done! Now get out there and attack that snow!

Cold weather don't bother me, oh no. I sewed myself some warm.

Follow

Sunday, 14 October 2012

Funky pinstripe trousers: KCWC wrap


The end of Kids' Clothes Week Challenge Fall 2012. One more item done, and two still remain in the cut-out-and-ready to go pile. I quite like them there just waiting for the right mood to take me.

My sewing machine lost its mojo around Day 5. I got into making a pair of trousers for T out of one of G's old suits. There was a lot of this happening:


And thus a lot of seam ripping. This was after the full dis-assembly of the machine on Thursday night to get dust out (so much dust! oops for the not-so-regular maintenance).  And then some stupid mistakes caused by pressing on when I should have stopped. Stupid mistakes like attaching pockets with triple stretch stitch topstitching, so as to pop out and look all cool, but doing it in the wrong place. You do not want to unpick that, believe me.

And in the end, once it was all fixed and done (and that took me the rest of my daily sewing hours), I'm not sure how much I like these trousers. I don't know if slippery recycled suit fabric and bright yellow topstitching really work. But what the hell, they're wearable. This kind of gives an impression of the effect I was trying to get (so it wasn't entirely unsuccessful, obviously):


The pockets are lined with fabric from an old shirt of G's. I picked it as it had the same yellow in as the topstitching.


The trousers themselves are fully lined with a very loud yellow cotton, but I didn't manage to get any pictures of it. It was the only suitable fabric I had to line them with - and this is where the whole yellow thing started.


Collage pictures of T are the way forward. He really never ever stands still enough for an actual portrait.


:: :: ::

Having complained beforehand that I don't feel creatively inspired to sew for my kids, I feel as if I've had a lightbulb moment this week. I really, really enjoyed pushing myself to get excited about it. I've realised - from looking in the flickr pool and reading people's KCWC posts - that it's just the same but different. 'Design' for your children is a thing, too. A fun thing.


Follow

Friday, 28 September 2012

So what's next? Kids' clothes, recycling, tips, tutorials and more!

Well, it's been a month or so since I started this blog, and I feel the need for a pause and a look at what's next. It's been nice to share my spring and summer makes - but there are better conversations to be had than "look at what I made!", no?

Plus, it's the end of September - we're back to school and well into the swing of things!

Kids Clothes Week Challenge is happening from 8-14 October and I'm signed up. Who's with me?


Recykleren (= making stuff out of old clothes, in Dutch) is happening now, but as by far my preferred thing to make from reycled clothes is clothes for children, I'm going to slack off and merge this with my KCWC efforts. I'm already identifying clothes to cull, though!


I've seen a lot of really interesting discussions recently about sewing (women's) clothes. Specifically, the pull between everyday wardrobe sewing, or sewing for the life you want to have (otherwise known as cake vs. frosting). It's struck me that, although I started sewing again out of frustration with the lack of decent "occasion dresses" on the high street, this kind of issue hasn't really been what's preoccupied me as a home sewer of clothes.

For me it's been the more mundane, how do I know that this pattern will work? How is it that yet again I have made a garment, with such high hopes, only to find I hate the result? This applies particularly to clothes for myself, but sometimes also to things I've made for the kids. And it applies whether I'm sewing a dress to wear to a wedding or a t-shirt to wear all the time. It still happens regularly! And I was really hoping it wouldn't once I had a couple of years' trial and error behind me :-)

So, I'm mulling over my ideas to see if I could come up with some Tips for (Successfully) Sewing Clothes - whether you're sewing cake or frosting or something in between. Putting some thought into what's worked and what's not could be helpful for others as well as my little self, right? I would probably include reviews of books or other resources that have been particularly helpful, too. What do you think?

Once I started thinking about it, I realise I have also a ton of little sewing tips I would pass on to friends who sew: all those small but useful ideas you come up with to make life easier and wish you had someone to tell. So I'll start telling you!

Of course, actual sewing is on my to do list too - in fact, it's basically a permament state of affairs. I've already got one or two things on the go, plus there's the usual and ever-changing mountain of things I want to make next, all at once. And I might - just maybe - come up with a tutorial or two. I have an idea for the kids, and an idea for me that would probably make a good Christmas gift too.

Yes, Christmas! Or insert your midwinter holiday of choice. Approaching, more quickly than we think...

:: :: ::

Anyone else taking up the Kids' Clothes Week Challenge? Or making a special recycled-sewing effort?

Who's on top of their Christmas sewing plans already? What have you done, what'll you be doing?

Is permanently sewing (or other crafting) your default setting, too? Surely I'm not alone in occasionally finding my actual life an encumbrance?

Follow